GETTING STARTED WITH MPLAB IDE
Hope you have all basic requirements that i have told for this tutorial .
If yes we can proceed or else click the link below and find requirements ..
http://gettingstartedwithmplab.blogspot.in/2014/04/basic-requirements-before-you-start.html
So double click on MPLAB IDE shortcut on desktop or in the start button ..

Now a window will open, like

Now what we have to do is to start a new project .For that on the main toolbar you can see many like
File , Edit , View , Project ,Debugger, Programmer etc ..
we will discuss about these whenever needed. So for now you just click on PROJECT
Project >> Project wizard...
Now a window will open like shown in image below

Click on next button .
now a window will open and here you have to choose the PIC you going to use.

Here i am using PIC 16F873A , so am selecting that . MPLAB IDE got a wide range of pics and you can select your own by clicking on that down arrow key..

And now click on the next button ..
new window will be like ..

This part is to choose your compiler..choosing compiler is up to you and depends on what kind of programming style and PIC that we are choosing . Here am choosing 16f873a pic and we will go with HI-TECh UNIVERSALtool suite.. This may be not there in the available lists but no need to worry , you can download the toolsuite file from below link.
http://hi-tech-universal-toolsuite-plugin-for-m.software.informer.com
Now , if you dont have hitech universal toolsuite download that and restart mplab ide.. and if you have tool suite,select that from the list , to see the list click on that down arrow

now select hitech universal toolsuite in this window select that click NEXT .
Now what we have done is that we have selected our PIC and COMPILER. Next part or window is where we create our project file.

You can see a browse button near to that field .

I will suggest you to create a new folder somewhere in your computer for new project and in this browse section , select your folder in which u want to store program and particular project .
Here i had created a folder on desktop named "getting started" . So i will click on browse and select that folder from desktop
 click open and then ,

Now type name of your project file and click save . Here i had created a project named sample .

Now click on NEXT for our last section of creating project file ..

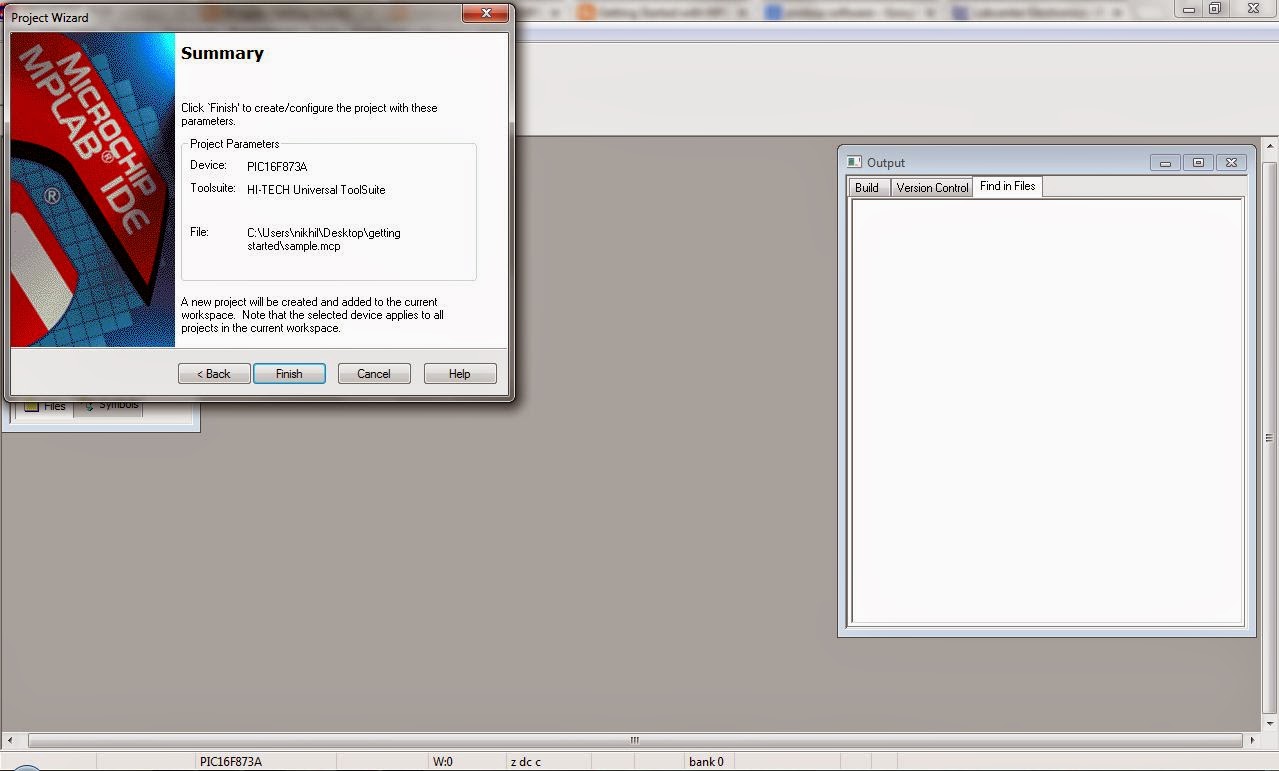
This page is the last page.. In this summary you can check everything PIC , COMPILER , FOLDER , are wright or not now if everything is wright click finish and your new project is ready .. :)
Now the project you have saved is a "mcp" file , sometimes another dialogue box appears asking to save mcw file. click save ..
now both mcp and mcw files are craeted that means you can start programming now .. :)

Finished page will look like

Now check three things,
1. Your project name on top left of screen

2. Your pic name on bottom of the screen.
 3. A box on left of screen with , Your project.mcp file and source file, header file etc as subdivisions ..

Now if these 3 are perfect then you have successfully created a new project in mplab ide :)
Now we can start programming :)
For starting from the basics of programming check on my next post or follow the link below :)
gettingstartedwithmplab.blogspot.in/2014/04/first-program-on-mplab-led-program.html
http://gettingstartedwithmplab.blogspot.in/2014/04/basic-requirements-before-you-start.html
So double click on MPLAB IDE shortcut on desktop or in the start button ..
Now a window will open, like
Now what we have to do is to start a new project .For that on the main toolbar you can see many like
File , Edit , View , Project ,Debugger, Programmer etc ..
we will discuss about these whenever needed. So for now you just click on PROJECT
Project >> Project wizard...
Now a window will open like shown in image below
Click on next button .
now a window will open and here you have to choose the PIC you going to use.
Here i am using PIC 16F873A , so am selecting that . MPLAB IDE got a wide range of pics and you can select your own by clicking on that down arrow key..
And now click on the next button ..
new window will be like ..
This part is to choose your compiler..choosing compiler is up to you and depends on what kind of programming style and PIC that we are choosing . Here am choosing 16f873a pic and we will go with HI-TECh UNIVERSALtool suite.. This may be not there in the available lists but no need to worry , you can download the toolsuite file from below link.
http://hi-tech-universal-toolsuite-plugin-for-m.software.informer.com
Now , if you dont have hitech universal toolsuite download that and restart mplab ide.. and if you have tool suite,select that from the list , to see the list click on that down arrow
now select hitech universal toolsuite in this window select that click NEXT .
Now what we have done is that we have selected our PIC and COMPILER. Next part or window is where we create our project file.
You can see a browse button near to that field .
I will suggest you to create a new folder somewhere in your computer for new project and in this browse section , select your folder in which u want to store program and particular project .
Here i had created a folder on desktop named "getting started" . So i will click on browse and select that folder from desktop
Now type name of your project file and click save . Here i had created a project named sample .
Now click on NEXT for our last section of creating project file ..
Now click next ..
Now the project you have saved is a "mcp" file , sometimes another dialogue box appears asking to save mcw file. click save ..
now both mcp and mcw files are craeted that means you can start programming now .. :)
Finished page will look like
Now check three things,
1. Your project name on top left of screen
Now we can start programming :)
For starting from the basics of programming check on my next post or follow the link below :)
gettingstartedwithmplab.blogspot.in/2014/04/first-program-on-mplab-led-program.html
No comments:
Post a Comment